Shakshuka : A Mediterranean Breakfast


IMG_9527.JPG

This is my signature and go to breakfast dish – Shakshuka. A Mediterranean staple, I fell in love with this in my travels to Israel and Arabia.

Shakshuka is essentially eggs that are cooked in a homemade,stewed tomato sauce.

I serve cucumbers and feta on the side. Sprinkle a little Zaa’tar (Middle Eastern dried herbs- thyme, oregano, etc.) on top for an earthy finish.

I also serve with some warm pita bread or buttered well done, English muffins.


IMG_9524.JPG

Shiza’s Shakshuka

Preheat the oven to 350 degrees Fahrenheit

Step 1: sautee in olive oil

  • 1 minced onion
  • 1 minced green or red bell pepper
  • A few cloves of minced garlic

Spices:

  • Ras El Hanout, sold at World Market, healthy amount (few tablespoons) | this adds an incredible layer of warmth and fragrance
  • cumin powder (about a teaspoon)
  • red chilli powder or paprika depending on how spicy you want it to be
  • salt to taste

Step 2:

  • 1- 35 ounce can of Whole Italian Tomatoes (chop these canned whole tomatoes yourself prior to putting in the pan)
  • After adding in the spices, if the sauce tastes acidic add a little bit of sugar to offset the acidity – this depends on how it tastes after adding in the spices. You have to taste the sauce and decide for yourself.
  • Harissa – morrocan tomato paste , sold at world market ( a few tablespoons); deepens the flavor of the sauce ; can substitute tomato paste

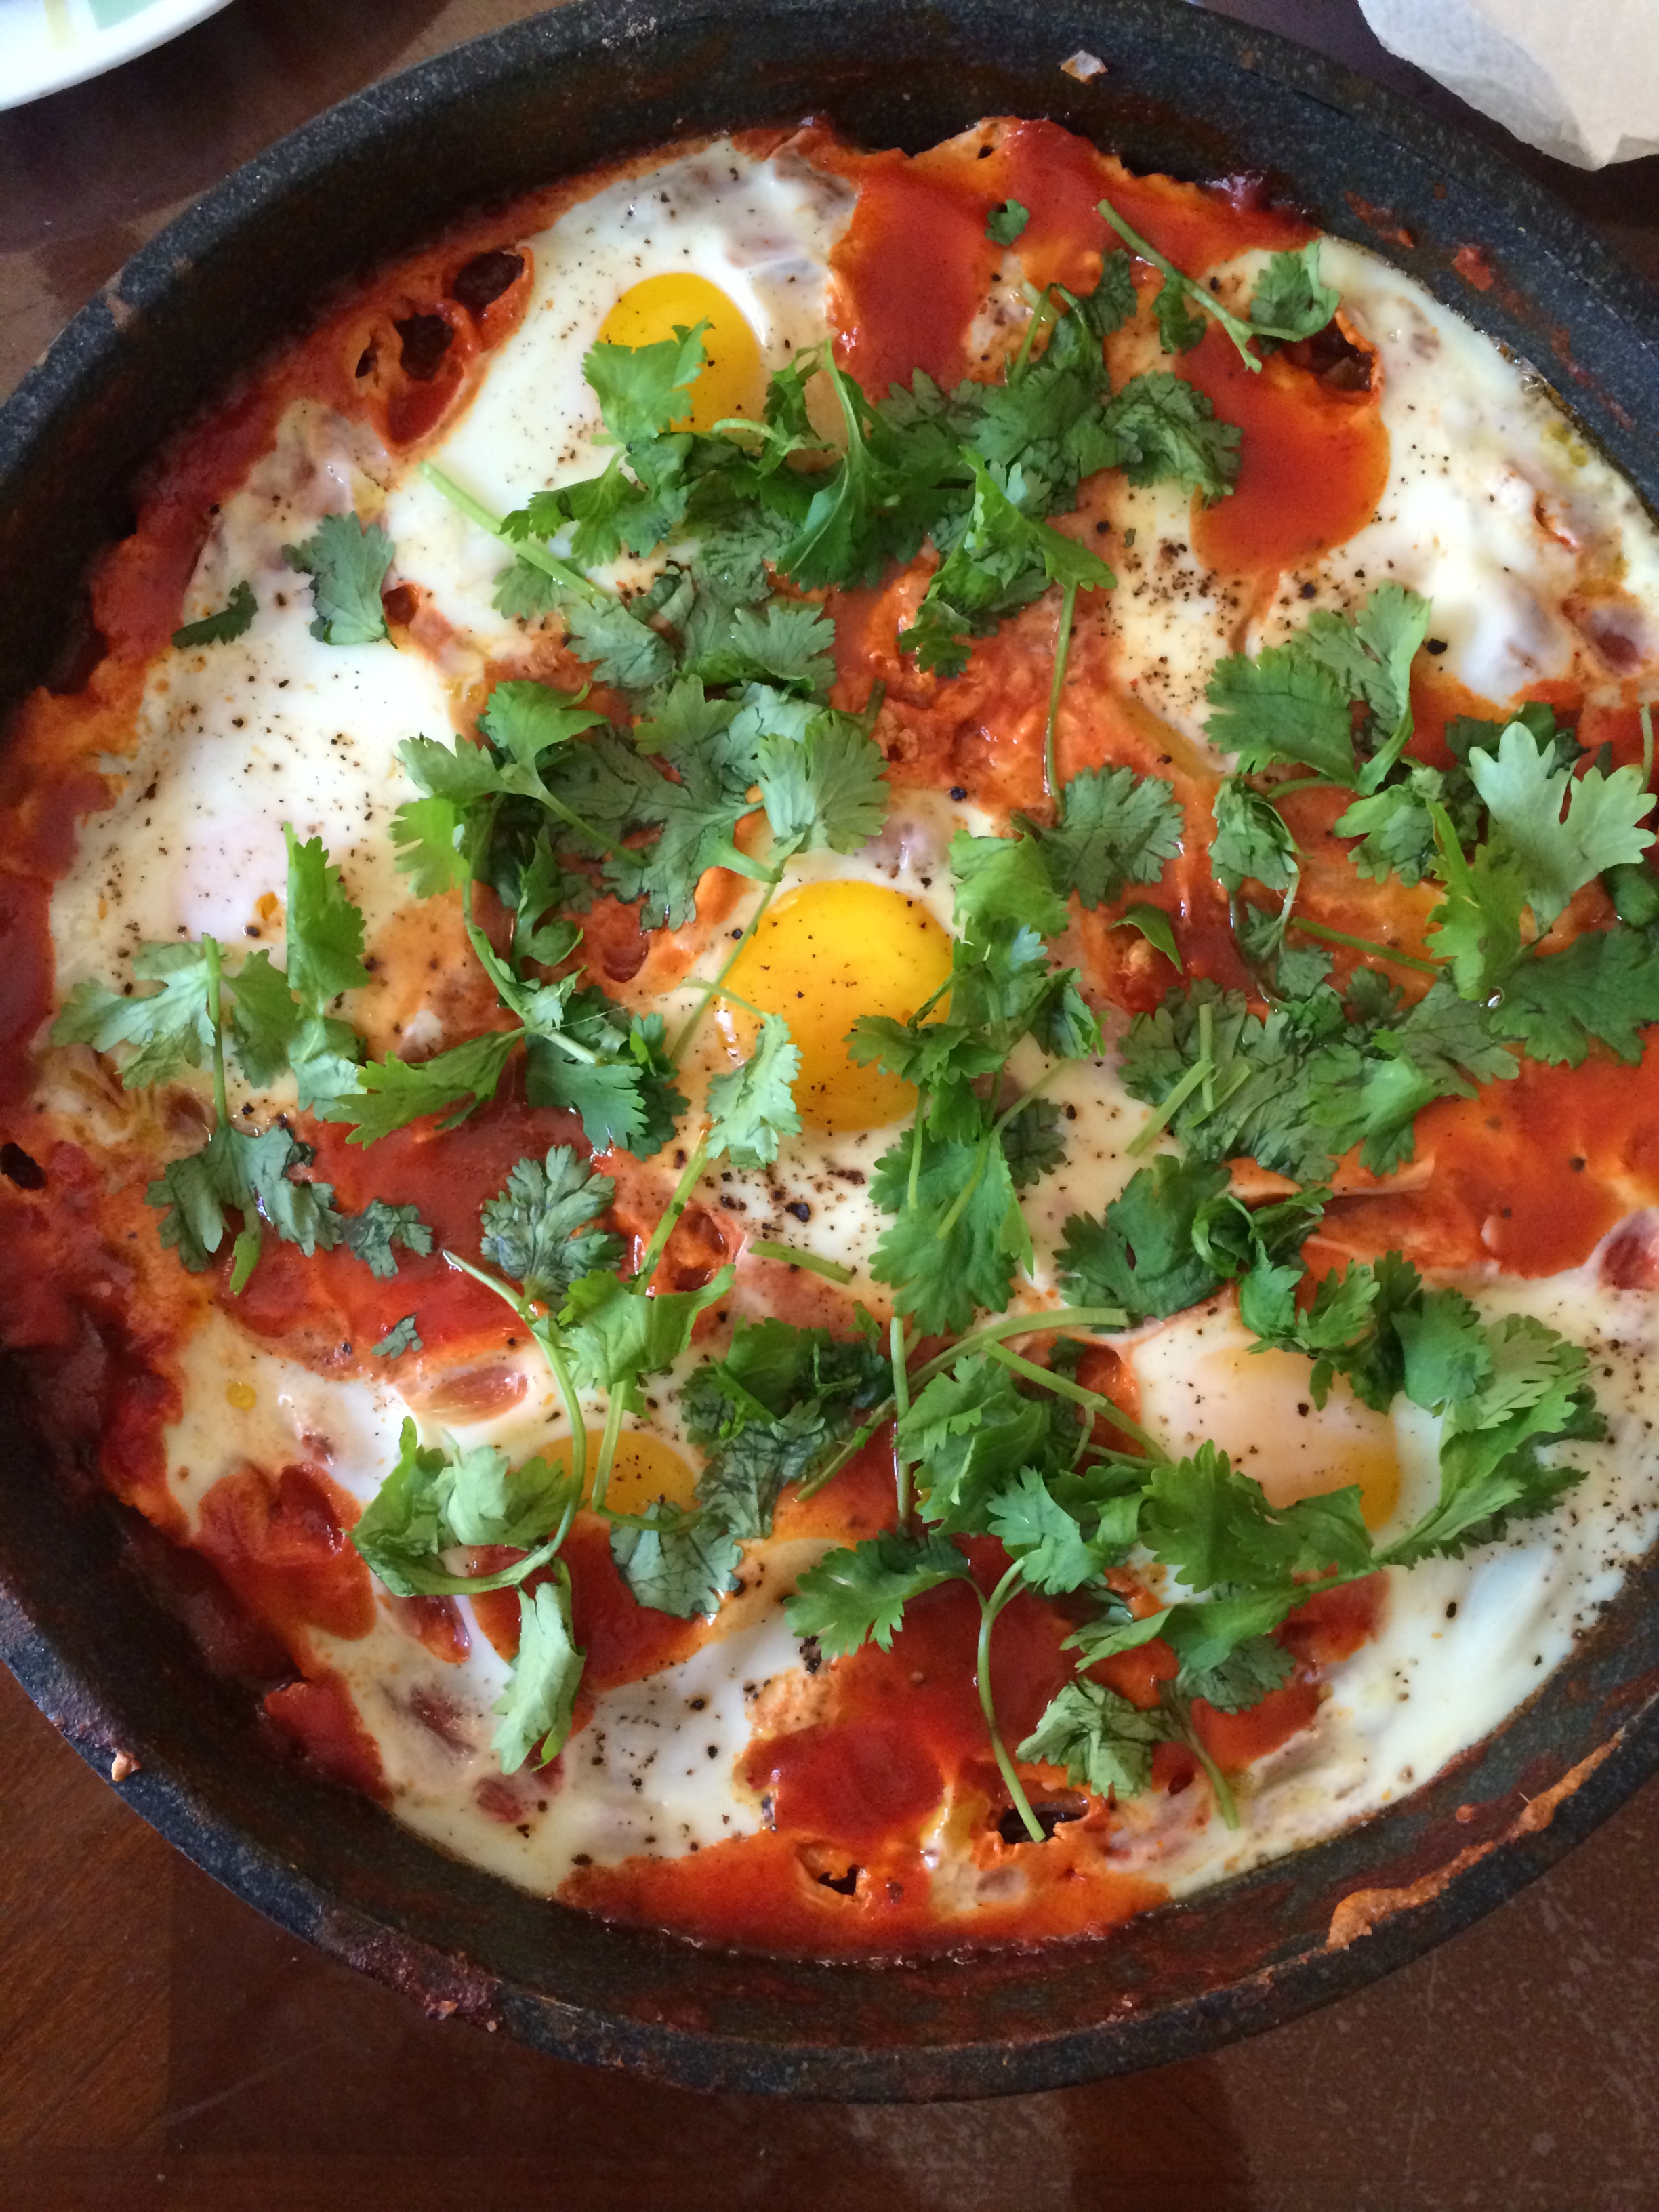
Step 3:  in a separate ramekin, crack each egg one by one and then start placing the eggs directly into the sauce one by one. I add as many eggs as I think will fit into the sauce and the pan. Typically about 8-10 eggs are added.

  • Once all of the eggs are in the pan of sauce, sprinkle a tiny bit of salt and pepper over the eggs
  • Place the Pan of Shakshuka into the oven to cook for 30-40 minutes.
  • You know it is ready when an inserted wooden toothpick into the egg comes out clean
  • Garnish with some chopped cilantro for added freshness


IMG_3025.JPG

IMG_9526.JPG


IMG_3148.JPG

Fresh flowers are completely optional, but I think it makes all of the difference to the aesthetic of the table. I arranged these bouquets with flowers from our garden. All of the flowers are different and even though their sizes vary greatly, I still love the look of it together.

Bon Appetit!

XOXO,

Shiza

Advertisement

DIY Dressing Table Decór

Aloha💓 Today I am going to be sharing with you guys my dressing table and give you guys cute diy ideas on how to glam your dressing table.

IMG_2383-0
So this is my dressing table. It is a dark mahogany color and I have an enormous circular mirror above it , which I adore. I am not particularly sure where its from , my parents bought it when I re-decorated my room. Anways, alot of the stuff on my dressing table are diys, art pieces, or random things such as my polaroid that just add a dimension to my dresser. I recommend adding vintage/memorable pieces or things you love to your dresser. It seriously makes it vibrant and really fun. Items such as statement accesories can be put on display on your dresser. These add a whimsical vibe to your dresser.

IMG_2377
This is a cute idea for storing your perfumes and mists. I keep mine on a white cake stand. You can find cake stands like these at stores that sell home goods such as Crate & Barrel, Target, or TJ-Maxx . I think it looks so pretty and is a good way to keep all of your fragrances in one place.

IMG_2394
This is an inexpensive yet chic way to store your jewelry. All you need is two small plates that are printed/fun, and a thin candle to put in between them. I recommend buying the plates from a vintage/thrift shop or getting them from the kitchen. Voilà you have a tiered jewelry stand!

IMG_2489-0
This is a piece of artwork that I painted. I placed it behind the jewelry as a backsplash. It adds a pop of color.

These are the three diys. The rest of the stuff were all purchased by shops. My black dress form necklace stand is from forever 21. The glass bottle on the far right has decorative colorful crystals on the bottom of it , and stores my hair brushes. I don’t know where he pink lamp is from because I got it as a gift.

IMG_2378

XOXO,
Shiza
Continue reading

Candles ✨

Hey dolls,
I wanted to keep it simple today so I’ll be talking about one of my current obsessions! Lately I’ve been over buying candles. I will be telling you about my candles and a cute DIY that is very simple to recreate!
Candle DIY:
Step 1- Find or buy a cute candle stand that goes with the color of the candle you choose. You can buy affordable candle stands at Target, World Market, or Pier one imports
Step 2- Next, get a small candle that will fit in your candle stand. You can easily find them at anywhere, I got mine from ikea.
Step 3- After, get some plant decor fillers. I bought mine from ikea as well. Btw they have a lot of cute things for decor!!
Step 4- Finally time to assemble the candle!
Fill the candle stand with the plant filler and place the candle on top.

IMG_2301

All about my candles: ✨
I use these candles to brighten up my room and bathroom. I have bought tons but the ones I’m telling you guys about are the best according to me. Stress Relief; got this one from bath&body works ($22.50) . Aloha Orchid; got that from Anthropology smells incredible ya’ll! ( $11.50) The two tiny ones are honestly the best quality small candles I’ve received, it was a present not sure where there from. I’ve lit them more than 10 times and they still haven’t run out! Magnolia Fresh linen, that’s from target.($20.00) All the tall candles are from target. Those are scented candle sticks. The white stands are from target, the red stands are from UlTRAS holiday gift set.
That’s just a few of my favs and recently used ones!

IMG_2295

IMG_2287

XOXO
-Zaina

How to throw a Tea Party : S&Z’s Tea

My bestfriend (co-founder of the blog) Zaina and me decided to throw a tea party last winter break. Today, I am going to share with you guys how to throw a tea party and some tips & tricks that will make it fun.

1) Select a theme. We did Alice in the Wonderland so that it would be more whimsical. Also, choose a dress code. We decided upon a dress & heels code to make it classy. I would recommend throwing the party with your bestfriend. Trust me it makes the experience waaaaay more fun and easy!
2) Make a guest list, do not invite too many people. It should be a small, intimate gathering with just your closest friends. I would recommend inviting from 6-8 people. Send out invitations about 2-3 weeks before the party. I found a cute invitation printout online and thats what we used!

IMG_0504

3) Plan out a menu and decide upon a location. We did it in the backyard. Have your bestfriend sleepover the night before the party so that you guys can purchase all of the ingredients and bake all of the baked goods the night before. This way you have more time to get ready and set up the next day.

IMG_1834

4) Make little whimsical tiered serving dishes using mismatched plates. I stacked different floral plates with a tea cup in between. For the cutlery we did small white appetizer plates and mismatched tea cups and clear wine glasses. Also we used a cheetah printed satin table cloth to add a more wonderland vibe to the table.For an added touch, we placed a white runner and placed rainbow christmas lights alongside. Here are pictures of how it all came together💓.

IMG_0520

IMG_0683

IMG_0569

IMG_1835
Overall, the party was a success. We drank many cups of tea and my friends and I had an amazing evening. Afterwards, we did a photoshoot and played ping pong. Hope you guys are inspired and host your own tea parties. If you do, leave us a comment about how it went. Goodluck💓
XOXO
-Shiza

DIY Valentine’s Day Gift: Vanilla Cakepops Coated in Chocolate

This Valentines Day inspired recipe is a sweet, thoughtful gift for your loved ones. It requires no special ingredients or tools, and is simply scrumptious. My friend Saki decided to teach me how she makes these delicious bites and we tested out the recipe yesterday and were pleased with how it turned out.

What you need:
1) A Container of store-bought frosting any flavor you prefer. I used vanilla.
2) Yellow boxed cake mix & the ingredients the box calls for, in order to prepare the cake. (mine called for 3 eggs, water,& oil)
3) Semi-sweet chocolate chips.
4) Cake Pop sticks ( if you cant find them, just cut wooden skewers in half)

Directions:
1) Bake cake according to package. I simply mixed all of the wet ingredients with the dry and baked the cake for 35 minutes in a 350 degree Fahrenheit oven.
2) Cool cake for about an hour ( its takes waaaaay less time if you cool it in the fridge).
3) Break the cooled cake into small crumbs.
4)Mix the frosting into the crumbled cake. Add enough so that the mixture is not too wet nor too dry. Make sure there is enough frosting in the mixture in order to form cake balls. Do not add too much frosting or it will cause the cake balls to break.
6)Form meatball sized balls. You can use an ice cream scoop in order to obtain uniform sized cakepops. I simply just estimated the size of each cake pop.
7) Insert the sticks into the center of the cake pops. Place the cake pops in the freezer for 10-15 minutes so that they can harden.
8) Melt chocolate chips over a double broiler or in intervals of 30 sec in the microwave until the chocolate has completely melted. You can use candy melts if you want a colorful coating on your cake pop.
9) Coat each cake pop in the melted chocolate. You can top the coated cake pops with festive sprinkles for another added touch.Allow it to cool on a tray in the fridge.

IMG_1694-0

IMG_1695-0

IMG_1706

IMG_1707-0

IMG_1727-0

IMG_1732-0

IMG_1733-0

IMG_1734-0

IMG_1735-0

IMG_1743

IMG_1753

IMG_1756

IMG_1763

IMG_1765

Xoxo
– Shiza

Guest Appearance: Saki

DIY : Refreshing Facial Mask

This cucumber face mask is perfect for those stressful days in which you need to relax and rejuvenate your skin . It is easy, quick , and most importantly made with ingredients you have laying around the kitchen. This effective face mask leaves your face feelig fresh, smooth, and revived.

Cucumber Facial Mask :
– 1/3 of a small cucumber, grated using
a cheese grater
– 1 tsp rose water
– 1/2 tsp olive oil
– 1 Tbsp yogurt

Blend the ingredients and apply on a
cleaned makeup free face. Leave on for about 7-10 minutes or untill the mask has dried. Wash off with water or wipe off using a damp washcloth. Enjoy!

Benefits :
Cucumbers are mainly composed of water . Therefore, they can hydrate your skin. Also, they have the ability to treat blemishes and dark circles because of its cooling effect and the high content of ascorbic acid found in these antioxidant rich vegetables.
Rose Water is a natural toner for the skin and adds a glow to it. In addition, it is an efficient cleanser and can remove dirt, oil, and makeup from the skin.
Olive Oil is abundant in vitamin E and is a great way to moisturize dry skin.
Yogurt contains natural anti-bacterial properties that can help eliminate acne. Also, the high content of zinc in it can aid in giving sunburn relief.

2015/01/img_1623.jpg

2015/01/img_1625.jpg

2015/01/img_1630.jpg

XOXO
– S